The first step we take in every Power BI report, is connecting to the data source. But maybe you have to change your data source after a while. For example when your transferring your solution from development to acceptance or production. Of course, we can switch data source in the data source settings of our Power BI files, but there are more (maybe even more efficient) ways to do this!
Using a parameter is a good option to switch data sources in your query. Some users probably do this by default or may think this is logical, but for those of you who aren’t aware, this can come in handy.
There are a lot of purposes in Power BI where you can use parameters, for example filtering rows. You read all about it on Miguel Llopis his blog here. In this blog I will focus on working with parameters in your source. The first examples used in this blog are based on a SharePoint list connection.
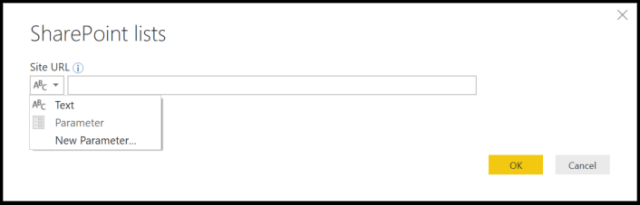
To connect to our SharePoint list, we must choose our data source type and afterwards we can copy-paste our Site URL in the bar. But instead of pasting your Site URL, you can choose for a Parameter as well. Be aware that not all data sources will support using parameters by default. For example, connection to an Excel file won’t support source parameterization in the default data connector. There is an option to still use Parameters, but I will get back to that later.
When can using a parameter be useful?
In my previous blog on applying multi-tier deployments, I explained more about DTAP (Development, Test, Acceptance and Production) environments and how you can use this in Power BI. In case you are working with multiple tiers, you probably do not only do that for your Power BI content, but also for your data source. So, each tier will have its own data source and own connection string. But you don’t want to change the data source for all your queries manually, apply all query changes in Power BI desktop and publish it to the Power BI Service repeatedly. To avoid editing all queries separately you can use the change data source option in Power BI, that is only option one.
So not only multiple tiers, but also large datasets can be a reason for using parameters in your Power BI data source. The bigger your data source, the longer it takes to apply all query steps and loading all data. Especially when you’re moving to production, the size of your dataset might increase exponentially. To load all data in your model in Power BI desktop might take a while, and of course we are working in an Agile way, so we do not want to wait for that!
So, what would be greater than switching your data source in the Power BI Service instead of Power BI Desktop! You can continue working in Power BI desktop on a small set of data and switch to the full set by changing the parameter in the Power BI Service! By doing that, you can benefit of all compute power which is on the Microsoft servers. Another advantage is that you don’t have to keep your laptop up and running all the time to apply your query changes. By default, it is not possible to change your data source in the Power BI service.
(For the geeks: Yes, there is an option to do this by using the Power BI API)
Changing data source by parameter
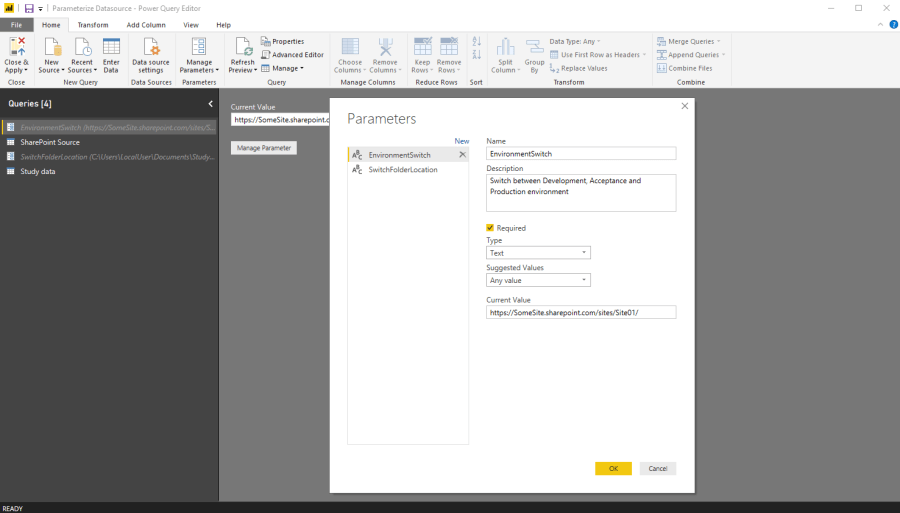
Let’s start of by creating a parameter. In the Power BI query editor, we can quickly create a Parameter. You can find this button in the Home part of the ribbon. By clicking new, the below window pops-up to create a new parameter. Give it a logical name and you can add a description if you want. At Type you can choose a lot of value types which you can use in your parameter. Make sure you put this on Text! By default, the type is set to any and then you won’t be able to change it in the Power BI Service.
The toggle for suggested values is not that important. In my example I choose to list all sites (data sources). This will show up as a drop-down box in your parameter, but unfortunately the list isn’t available in the Power BI Service and you have to put it in manually there.

After clicking OK we have created our parameter. Now we are going to add a new data source to our Power BI file and choosing for Parameter instead of entering the URL. This is the same as mentioned above in the introduction of this blog. Afterwards you can apply all the Power Query steps you want to do and that’s mainly it.
Now you should be able to switch your data source by switching the parameter value. But wait! When we are using the SharePoint connector, we must be aware of all default query steps Power BI will do for you. Because now your query will fail after switching the data source and you will end-up with an error like this:
Expression.Error: The key didn't match any rows in the table. Details: Key=Record Table=Table
When are going to have a closer look at the Power Query steps which are applied. The second step is the Navigation step. When we look at this step, we will have something like this:
= Source{[Id="abcd1234-defg-5678-hijk-9123lmno4567pq"]}[Items]
What Power Query is doing by default, is calling the SharePoint List Id to direct the query from source into the right list and get all Items in that list. But by switching your source to another environment, your Id will probably not be the same! We can fix this by changing this query step and not calling the List Id but another unique value. In most cases your SharePoint List Name will be unique as well. So, what I did, was changing the above-mentioned navigation query step into the below query step:
= Source{[Title="List Name"]}[Items]
The result of the step above is that your navigation step will look for the list title and get all items from that list. Problem solved! For a real cleans solution you only have one thing left to do. When we open the Advanced Editor, we see that our navigation step is named after the List Id.
let
    Source = SharePoint.Tables(EnvironmentSwitch, [ApiVersion = 15]),
    #"abcd1234-defg-5678-hijk-9123lmno4567pq" = Source{[Title="List Name"]}[Items],
    #"Renamed Columns" = Table.RenameColumns(#"abcd1234-defg-5678-hijk-9123lmno4567pq",{{"ID", "Key"}})
in
   #"Renamed Columns"
You can rename the Power Query step in to any naming you want. For example name it to your List name. Be aware that you must change this in the (in this example) Renamed Columns step as well. In the Power Query syntax every step is calling the result of the step before by using the name as first part.
What in case parameters are not available for your data source?
As already mentioned, not all data sources are accepting parameters as input. For example, the Excel connector will not support this by default because it is aiming for a specific file. Of course, there is still a solution to work with parameters to switch between files or file location for example. In the below example I’m using the default Excel connector and will switch folders where the Excel file is located by using a parameter.
After setting up a connection to the Excel file and opening the advanced editor, your Power Query will look like something like below. So now the query is pointing directly to the file Study.xlsx in the Downloads folder.
let
    Source = Excel.Workbook(File.Contents("C:\Users\LocalUser\Downloads\Study.xlsx"), null, true),
    Table1_Table = Source{[Item="Table1",Kind="Table"]}[Data],
    #"Changed Type" = Table.TransformColumnTypes(Table1_Table,{{"Hours", Int64.Type}})
in
    #"Changed Type"
Now we want to change the folder path by parameter to the documents folder. We can do this by creating a parameter in the same way as mentioned before for the SharePoint connections. Again, make sure your parameter type is set to text values. In my example I created a parameter named SwitchFolderLocation. By opening the Power Query code in the advanced editor, your query will look like below. But we replaced the folder path with the parameter.
let
   Source = Excel.Workbook(File.Contents(SwitchFolderLocation), null, true),
    Table1_Table = Source{[Item="Table1",Kind="Table"]}[Data],
    #"Changed Type" = Table.TransformColumnTypes(Table1_Table,{{"Hours", Int64.Type}})
in
    #"Changed Type"
A little remark, you must remove the quotation marks as well. Otherwise the it will be interpreted the wrong way. Now you are done!
Switching Parameters in the Power BI Service
After doing your Power Query steps, data modelling and building your report, everything it is ready to publish your report to the Power BI Service. Once your there, you want to change your parameter online, for example to switch to the production environment. This is a really simple thing to do.
In the workspace where you published the report, you first go to datasets and click settings.

Afterwards, you go to the datasets tab in the settings and click the data source you want to edit the parameter for. You will see a Parameter tab there where you simply can edit the parameter. Do not forget to apply after changing, and you’re done! Your data set is moved to the other data source now.


Pingback: Pimp the dataflows connector in Power BI – Data – Marc
Pingback: Top N to improve report building! – Data – Marc
Pingback: Versioning and CI/CD for Power BI with Azure DevOps – Data – Marc
I can’t seem to find how to make Dataflows take advantage of this technique or parameterizing a Source (or other reasons we would use a Parameter). On a Dataset, within Settings, there is a Parameters drop down, but that does not seem to exist for a Dataflow. Any advice for using parameters in a Dataflow?
LikeLike
Unfortunately this option is not available in dataflows indeed. The parameter value cannot be updated / changed from outside the dataflow. You have to go into edit mode to update the values. I can recommend to share this feedback with Microsoft as well, using the forum.
–Marc
LikeLike
I succesfuly applied the steps of “Changing data source by parameter”
but how can I allow the end user of the power bi app to add text that changes my query parameters in his report, as I need the user to enter text and this text replaces the defult the data source at the beginning of the report
LikeLike
Hey Jackie,
Thats not possible with standard reports as far as I know.
Consider looking at Paginated Reports which should allow certain scenarios, or a slicer on Direct query mode which then populates the query to the data model.
–Marc
LikeLike
“Thank you for your assistance, Marc. I will now proceed to search for Paginated Reports.”
LikeLike