
In my previous blog, I wrote about using Tabular Editor to migrate existing (Azure) Analysis Services models to a Power BI data model. This is pretty awesome already! Once you moved your model to Power BI, you can also start using the functionality of the entire platform. One of the most useful features is dataflows in Power BI!
In this blog, I will describe how you can bring existing tables to a dataflow and easily change the connection in your Power BI data model to read the data from the newly created dataflow.
The case
As said, the previous blog was about moving an (Azure) Analysis Services model to Power BI. In Analysis Services there is nothing like dataflows, but now we are in Power BI, we can start using dataflows. As a starting point, the same data model will be used as was brought to Power BI before.
The model in this example is a simple star schema including a fact table and two dimensional tables. In this example we will move the Car dimension to a dataflow, so we can re-use this table in other data models as well. Below I describe more about the advantages of dataflows and why especially moving dimensions to dataflows can be useful.

Advantages of dataflows
Dataflows are especially useful when you want to re-use specific tables across different data models. Below I list a few of the advantages of dataflows before we get started.
- Lowers impact on data source. With dataflows you only process the table once and centrally save the result in a dataflow. From that point on, it can be used inside the Power BI platform in different data models. By doing so, you avoid running the same query from multiple models.
- Single version of the truth. Where Power BI is often used from self-service perspectives, there is also a risk of having different results in different reports, while the same table is queried. This can be caused by having other filters applied or other transformations. Building dataflows from a central perspective and allow others to use your dataflow will help in getting one version of the truth since everyone uses the same dataflow entities with the same logic applied.
- Refresh schedule optimization. Usually if you refresh your Power BI dataset, the entire model will be processed. All queries will run to get the latest data. In fact, this is suboptimal since you hit the data source multiple times and even for tables that you maybe only want to refresh once a day or once a week. Most likely these are dimensional tables. If you put them in a dataflow, you can give this dataflow a separate refresh schedule and lower the impact of queries on the data source.
- Less dependencies and better error traceability. As mentioned in the dataflow advantage above, the entire model will process in a dataset. If an error occurs, none of the tables will be refreshed and the process will stop. By splitting your logic in multiple dataflows with separate refresh schedules, you lower the dependencies between tables. If one of the dataflows fails to refresh, the others will continue. The dataset will only import the result sets of all dataflows, which is a lower chance on failures.
All by all, enough prove that dataflows can be useful! Probably there are more reasons, but these four are the ones I usually explain to others when dataflows cross the conversation.
Move to a dataflow!
As described above, we want to move our Car dimension to a dataflow and then change the connection in our data model to read the data from the dataflow going forward. Below a step-by-step guide.
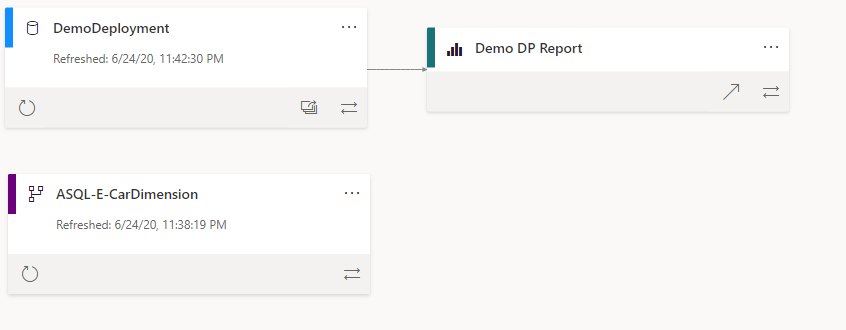
Currently, our lineage looks like this:

1. Connect to a Power BI XMLA endpoint in Tabular Editor
We start off by creating a connection to our existing data model in the Power BI Service. After opening Tabular Editor, we choose
File > Open > From DB (CTRL + SHIFT + O)

2. Get XMLA endpoint in Power BI.
As second step we get the XMLA Endpoint from our earlier deployed model. We can get the endpoint by going to the Power BI Service and go to the dataset settings. In the tab Server Settings, we will find the endpoint.
By default, the endpoint is similar to below, possibly extended with the data model connection as initial catalog.
powerbi://api.powerbi.com/v1.0/myorg/[Workspace Name]

4. Choose database
After clicking on OK and authenticating to the Power BI Service, we have to choose the database we want to connect. Since we will use both read and write functionality in this step-by-step guide, we have to make sure that we work with the correct compatibility level. Make sure the model is in compatibility level 1520.

5. Find the Power Query Expression for the appropriate table
After the connection is successful, we can read the tabular model with Tabular Editor. In the left menu we see all our tables. Identify the table you want to move to a dataflow and click on Partitions and finally click the small button with the three dots to get more details.
For us this is the Car Table, where we have one partition we want to bring to a dataflow.

6. Copy the Power Query Expression
Once the Partition Connection Editor opens, you can click the small dropdown button in the Expression field. Here you will find the Power Query Expression that we want to move to a dataflow. Copy the expression.

7. Build the dataflow
Go to the Power BI Service and navigate to the Workspace where you want to locate the to be created dataflow. We just copied the Power Query expression that we will paste in a blank query. After authenticating to the source, click save and give the dataflow a reasonable name.
Also check my blogpost about keeping your dataflows organized for naming convention for dataflows.
If you have never created a dataflow before, please see the links at the bottom of this blogpost for more information on how to create a dataflow from scratch.
Please also be aware of possible syntax differences. In this case I am using an Azure SQL Database. In the Tabular Model that was moved from Analysis Services to Power BI, the connection looks slightly different. Compare the above screenshot with the below. If you experience difficulties like this, I advise you to quickly build a connection in Power BI Desktop to the same data source to identify the differences in the connection.
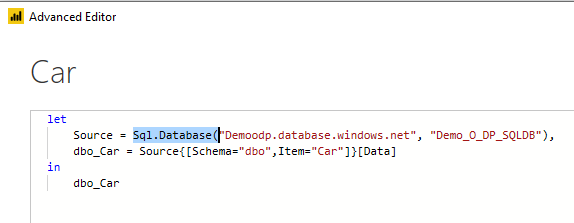
For clarity, in Tabular Editor my Power Query Expression looked like this:
let
Source = #"SQL/[db server name].database.windows.net;[db name]",
dbo_Car = Source{[Schema="dbo",Item="Car"]}[Data]
in
dbo_Car
In Power BI Desktop it generates this:
let
Source = Sql.Database("[db server name].database.windows.net", "[db name]"),
dbo_Car = Source{[Schema="dbo",Item="Car"]}[Data]
in
dbo_Car
8. Build a query to the dataflow in Power BI Desktop
After we have saved the dataflow, do not forget to process it at least once. Since our model is a Power BI model, we can connect to dataflows as well. In order to connect to our just created dataflow, we quickly generate the Power Query Expression for that in Power BI Desktop.
Once we have generated the Power Query Expression, please copy this.

Notice that the generated Power Query Expression for dataflows include a lot of hardcoded ids. If you move multiple tables to dataflows, you can change this easily. If you want to make it easier, please check out my blogpost on how to pimp the dataflows connector.
9. Change the Power Query Expression in Tabular Editor
In the previous step we have copied the Power Query Expression for the dataflow. Now we go back to the Partition Collection Editor, as described in step 6, where we replace the existing Power Query Expression for the one pointing to the dataflow and click OK.

10. Save changes to the database
As a final step, we have to save the changes we have made to the model in the Power BI Service. Here the XMLA Write capability comes in. In Tabular Editor we can click the small save button on the left top to save our changes to the Power BI Service.
Since XMLA Endpoints only write meta data, do not forget to hit the refresh button before the model starts reading the data from the dataflow!

Wrap up and remarks
Let’s have a quick look back on what we actually did. We picked up a Power Query Expression from a table in our already deployed Power BI dataset and moved it to a dataflow. Next to that, we changed the Power Query Expression in our dataset to start reading data from the dataflow. All by all, this can be very useful. Though, there is a remark to make because we also broke something!
This approach works fine, and I have tested it for over a week. It is stable, but we did break the lineage view in Power BI. If we have a look at the lineage, the newly created dataflow is not linked to our dataset.
Having that said, Power BI is releasing every month and XMLA endpoints write is still in preview at the moment of writing this blogpost. Probably this approach pushes the boundaries a bit? I expect this to be solved over time and I also provided this feedback to Microsoft.
Still, I can conclude that this approach can be useful as a next step, after you have moved your (Azure) Analysis Services model to a Power BI dataset. Maybe you were using the same query multiple times in different models in the past with (Azure) Analysis Services, now you can centralize the query in a dataflow and lower the impact on your data source, have one version of the truth and a better maintainable solution architecture.


Nice method. But it requires Premium, right?
The “Server settings” mentioned in point 2 isn’t in my Power BI Service Pro-environment…
LikeLike
Hi Klaus,
That’s true, this is the XMLA endpoint that is only available on premium. Though, there is no need for a P-SKU, you can consider to do similar things with an A-SKU capacity. Check out this blogpost for more details: https://justb.dk/blog/2020/04/using-the-xmla-endpoint-without-premium/
Hope this answers your question,
Marc
LikeLike
Thanks, Marc
The answer I expected.
I’ll check out Just’s blog post then 🙂
LikeLike