
Imagine, you have everything setup and well secured in your data lakehouse, or data warehouse if you will. Then a user starts consuming the data in Power BI and imports all data according to the security applied to that users’ permissions. Once the data is imported, all data can easily be shared to others who might have other permissions on the same dataset. Potentially, this leads to a breach of data to people who should not have accessed this data at all. Ideally, you replicate the security from the source into Power BI, but without setting up everything by hand.
In this blog post, you will learn how you can automate the replication of security from source to your Power BI data model in just a few steps. A blog post based on an actual client case and written by Vytautas Kraujalis and myself.
Introduction to the use case
In Power BI solutions, we can work with common security implementations like Row level security (RLS). RLS lets you restrict some data for certain individuals or groups. Object level security (OLS) lets you restrict, as the name suggests, an object, which could be a table, column or measure.
RLS and OLS can all be manually setup by manually in the Power BI Solution. However, in some situations you want to take over the security as applied in the source system, like your data lakehouse, data warehouse or anything else. By default, this is not applied, unless you use DirectQuery and passthrough the user credentials to the source. Given DirectQuery is often not the best solution to a performing Power BI solution, not yet talking about the performance impact on the source system which might not be intended for certain loads of queries, it is recommended to import data in Power BI. Still, the security should be taken over in your Power BI solution, but how to do this?
In Power BI, RLS can be added using a simple and intuitive Power BI Desktop’s UI, OLS, on the other hand, can only be added editing tabular model directly, e.g. with Tabular Editor, which requires additional knowledge of the tool. As of this blog writing, OLS cannot be added using only Power BI Desktop.
This is a manual process and depending on the number of roles and restrictions, could be a cumbersome process.
Let’s take a simple data model:

And 2 report pages using different fact tables:


Authorization matrix
To maintain the security roles, we leverage an authorization matrix. Often a matrix or table to define roles is available in a data lakehouse, or any other source to maintain roles and security that should be applied. Given this blog post describes an example, suppose we have a simple table containing role name, restricted table/column name and restricted data (in case of RLS) that we want to implement in our Power BI solution:
| SecurityRole | RestrictedTable | RestrictedColumn | RestrictedData |
| Headquarters | |||
| Sales | FactFinance | ||
| US Manager | DimSalesTerritory | Country | United States |
| US Manager | DimSalesTerritory | Region | Northwest |
| DE Manager | DimSalesTerritory | Country | Germany |
| DE Manager | FactFinance | ||
| DE Manager | DimCustomer | Email Address |
In this example, each row represents either RLS or OLS type. Out of this table, we would create such roles:
- “Headquarters” – no rules applied, role sees everything.
- “Sales” – “FactFinance” table is restricted, this role won’t see this table. (OLS)
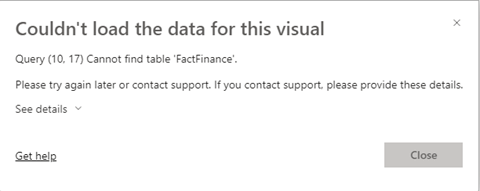
For this role, a visual which uses FactFinance table data will throw an error, OLS works as intended.
- “US Manager” – “DimSalesTeritory” has restricted data, this role will only see data which is filtered on DimSalesTeritory[Country] == “United States” && DimSalesTeritory[Region] == “Northwest”. (RLS)

The user only sees the filtered data.
- “DE Manager” – role has 3 restricted tables:
- “DimSalesTeritory”, data is filtered on [Country] == “Germany” (RLS)
- “FactFinance”, table is restricted, won’t be seen by the role (OLS)
- “DimCustomer”, table column [Email Address] is restricted and won’t be seen by this role (OLS)

A user with this role sees only filtered data and also, for one of the visual, an error appears because of the OLS. The error indicates that the table and column cannot be found, which indicates either a corrupted dataset, or a hidden object by OLS.
What do you need to get this automated?
- Power BI Premium
- Database or place to save your security matrix
- Python (or any other scripting language of your preference)
- PowerShell
Power BI Premium
Roles will be deployed directly to a Power BI dataset hosted in premium workspace; we will be using XMLA endpoint to deploy the roles. RLS and OLS automation can only be done in a Premium workspace. To get this automation working, make sure that your capacity has XMLA-Read/Write permissions enabled.
Database
In this solution, we setup a database where we locate and maintain the security matrix. Normally, you could read existing security tables from source systems of course. For this example, the security matrix was part of the “AdventureWorksDW2019” local SQL database.
Python
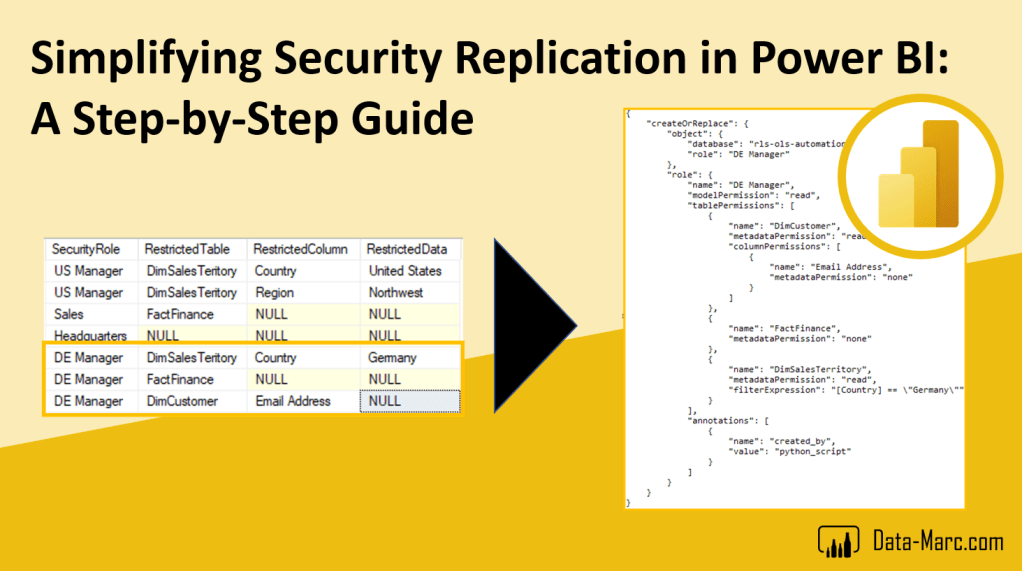
Python (or any other of your preferred scripting language) is used to actually generate the TMSL script for roles. The main idea is to read the security matrix shown above, process it and output TMSL role script which can be used to deploy the roles directly to Power BI dataset through XMLA endpoint. An example below shows the security matrix (on the left) with 1 role highlighted (having 3 rows, 1 for RLS and 2 for OLS). Out of those 3 highlighted rows, a TMSL script (on the right) has been generated to create a role with such rules in our Power BI dataset.

In this example, for each role we generate a separate JSON TMSL script. The needed python script may vary depending on the requirements of RLS and OLS. To generate this script, a python code can be accessed in this GitHub repository.
PowerShell
PowerShell is used to deploy the TMSL scripts to Power BI dataset using XMLA endpoint.
Once we have our TMSL role files, we can write a PowerShell script to read our saved roles .json files into an array:
# read TMSL scripts from "./Roles" directory into an array
$jsonFiles = Get-ChildItem "Roles" -filter *.json
$tmslScripts = foreach ($jsonFile in $jsonFiles)
{
  $role = get-content $jsonFile.FullName
  @{Name=$role}
}
Then we simply loop through each role and deploy it to our dataset using Invoke-ASCmd function:
# Execution all TMSL scripts
$tmslScripts | ForEach-Object {
    # Get single role TMSL script
    [String]$roleObject = $_.Name
    # Execute operation
    Try {
        Invoke-ASCmd -Query $roleObject -Server: $XmlaEndpoint
    }
    Catch{
        # Write message if error
        Write-Host "An error occured" -ForegroundColor Red
    }
  }
Note, that $XmlaEndpoint is the link to your workspace in a format:
“powerbi://api.powerbi.com/v1.0/myorg/Your Workspace Name“
If we execute those scripts, for each role we’ll send a request to create or replace specified role, we can confirm this by launching SQL profiler and looking into Command Begin event:

You can notice that the script contains annotation “created_by – python_script“ which we added during python script generation to confirm that this script is indeed coming from our automated process. From PowerShell, if the request has been successful, an empty XMLA response will be received:
<return xmlns=”urn:schemas-microsoft-com:xml-analysis"><root xmlns=”urn:schemas-microsoft-com:xml-analysis:empty”></root></return>This script can also be accessed in this GitHub Repository.
Open ends
- Ideally, DevOps deployment should be used for such use case and initial deployment of the security, this step was not yet explored. Also, any other runtime to execute above scripts can be considered.
- For each role, a separate JSON file was generated, and a separate query was executed against the dataset for each role. Combining roles into one query was not explored.
- Deployment script does not check which roles already exist (or do not exist) in the Power BI dataset, if one deletes a role or restriction from security matrix, it won’t be automatically removed from the Power BI dataset.
- Script overrides existing roles each time a deployment script is called. This is not optimal in case there are no changes. This check could be implemented in a pipeline for example.
- Proposed security matrix only covers a simple RLS implementation where a column is only filtered on one value. More complicated expressions would need some adjustments to the Python script.
- The current scripts focus on automating the role expressions and not yet on assignment of users or groups to the roles. In order to also assign a user or a group to a role, snippets from this script can be used.
Wrap up
We’ve explored a simple use case of RLS, OLS and showed that it’s possible to automate the deployment of such rules. Before adopting such process and putting this to the use in your production environment, some considerations should be addressed written in “Open ends” above.
Moreover, once the new Tabular Model Definition Language (TMDL) will be available publicly (recently announced in this blog post by Microsoft), the automation part will become even more simpler, as generating TMDL script for roles will be much easier instead of generating TMSL script. Be sure to learn more about TMDL reading the blog post and watching this session from SQL Bits presented by Mathias Thierbach and Gabi Munster.
Resources
Feel free to check the resources below for more information.
Documentation:
- Row level security in Power BI – documentation
- Object level security in Power BI – documentation
- Tabular Model Scripting Language overview
- TMSL Roles Object (used in this blog)
- Dataset connectivity with the XMLA endpoint
- Invoke-ASCmd – PowerShell function documentation
Source code used in above example can be accessed in this GitHub repository.
Be sure to check other blogs on similar topics:
- How to automate SSAS tabular model processing in SQL Server 2016 by Craig Porteous. (shows how TMSL scripts could be executed with SQL Agent)
- Tabular Automation With TMSL and PowerShell by Ust Oldfield.
Co-author of this blog

This blog is co-authored by Power BI expert and colleague, Vytautas Kraujalis.
Vytautas is passionate working with data and implementing various models to extract useful insights for business needs. Love tackling various data issues at different stages: from ingestion, storage up to reporting and presentation.
Furthermore, a shout out to colleague Laura Kačinskienė for collaborating on the solution described in this post.

Pingback: Security Replication in Power BI – Curated SQL