
Back in February, I wrote a blog on how you can trigger a single table to refresh in your Power BI data model. This blog described how you can achieve this goal using a PowerShell script and the ASCmd cmdlets for Analysis Services, which also works for Power BI Premium. In the wrap-up of that blog, I promised to follow-up with a blog on how to achieve the same goal with Azure Data Factory. It took a little bit longer than expected to finalize this post, but here it is!
In this blog, co-authored by my colleague Paulien van Eijk, we will describe how you can automate your single table refresh in the Power BI Service, including all dependencies with downstream dataflows using Azure Data Factory and Azure Automation. All this is based on real life scenarios and a solution build in collaboration between Dave Ruijter, Paulien and me.

Refresh process automation using Azure
Let’s start with a little more explanation on why we want to automate the refresh process using Azure Data Factory. In the following sections we will describe the why and how of triggering a refresh using Azure Data Factory.
Reasoning for single table refresh revisited
As the earlier blog described, there are multiple reasons why could consider refreshing a single table. Below shortly summarized why you might want to trigger a single table.
- Faster refresh time throughout the day with multi-million row imported datasets, by only refreshing the tables that are adapted to change and leaving dimensional tables out of the refreshes.
- Near real time datasets where the default refresh intervals are not sufficient.
- Lowering network traffic and data movement between data source and Power BI dataset during a refresh. Only refresh elements of the dataset that are actually changed.
Trigger a refresh using Azure Data Factory
As you can trigger a single table refresh using PowerShell, like described in an earlier blog, why should we look at any alternatives? When you pull data from a data platform, it is very likely that you want to trigger your Power BI dataset to refresh after your data platform finished processing. Many times, when you work with a Microsoft data platform in the cloud, it is likely that you are using Azure Data Factory or Synapse Analytics to orchestrate this process.
As soon as we try to integrate Power BI refresh triggers in your Data Factory orchestration, you can of course trigger a refresh to happen using the Power BI REST APIs. Dave Ruijter wrote a blog on this topic in the past. He describes step-by-step how you can setup the refresh mechanism for your Power BI refresh in Azure Data Factory using the Power BI REST API. Though, this will trigger a full dataset to refresh and does not accept any specification for a single table refresh. So what alternatives do we have?
Asynchronous refresh operations
Comparing Power BI Premium and Azure Analysis Services, the engine should be (close to) similar. So, the refresh process as well right? Azure Analysis Services has an asynchronous refresh API that accepts Tabular Model Scripting Language (TMSL) in the body of the API call. But unfortunately, the Power BI REST API does not support TMSL in the API body. Therefore, we had to find a way around as the Power BI REST API was not an option any longer.
Knowing that the engine is (close to) similar and in the previous blogpost we have already seen that the ASCmd cmdlets in PowerShell for Analysis Services also work for Power BI Premium, it could be an option to go the same route here. The blog written by Jorg Klein about Process Azure Analysis Services database from Azure Automation was a valuable input to put the right pieces together for an end-to-end working solution. This explains the need for Azure Automation next to Azure Data Factory.
Solution setup
In the end-to-end solution, we use a few different Azure services are used that will be referenced through the following section. Below a short list of services used.
- Azure Data Factory, to build the orchestration pipeline.
- Azure Key Vault, to safely store secrets such as Service Principals and the WebHook URL.
- Azure Automation Runbooks, to automate the PowerShell script in Azure.
Understanding Azure Automation
Azure Automation is one of the key aspects of this solution in combination with Azure Data Factory. Azure Automation consists of two elements in our Azure resource group after deployment, which is the Azure Automation account and the Runbook. The later is the script that is triggered once the WebHookURL is called, where the Automation account is only the payment method and account associated to be able to trigger this script to run.
In Azure Automation, the solution will have three elements that are required in order to connect it to Azure Data Factory in a later stadium. Below each element shortly described.
- Webhook: the webhook configuration is the trigger URL that we will save in Azure Key Vault. This webhook is used to send a trigger to the Runbook to start running.
- Credentials: the credentials are saved (encrypted) in the Azure Automation Account and handles the authentication between the runbook and Power BI. This can either be a Service Account or a Service Principal. In Azure Data Factory, we read the credentials from Key Vault, where we have to reconfigure them for the runbook.
- Script: the script is the PowerShell script that is triggered via the webhook to run and uses the credentials as saved in the automation account. In the body of the API call, the script receives several parameters sent by Data Factory in the body of the request. These parameters are:
- The Power BI workspace name: to be used to concatenate in the script with the default string to get the XMLA endpoint.
- Dataset name: the dataset name is used in the TMSL script to specify the dataset to trigger the refresh of specified table.
- Table name: the table that needs to be refreshed in the specified dataset.
- Refresh policy: defining the type of refresh that needs to be executed for the specified table in the specified dataset.
Setup the solution
In order to build this setup, there are three steps to take.
- Setup Azure Data Factory and Key Vault
- Setup Azure Automation
- Sending the request from Data Factory to Azure Automation
Setup Azure Data Factory and Key Vault
As we do not want to repeat the steps that Dave already wrote down. We encourage you to have a look at what Dave described in his blog post. He describes how you can setup Azure Data Factory and using Key Vault to store authentication elements like the clientId and secret.
Setup Azure Automation
Jorg Klein described in his blog how you can setup Azure Automation for Azure Analysis Services. One of the first steps he takes, is to setup the credential in Azure Automation. Although we used Azure Key Vault in Azure Data Factory, I suggest for the ease of the solution to configure the authentication in Azure Automation as well. A nice future improvement would be to read the credential from Key Vault to, but for now lets stick with the credential in Azure Automation.
After creating the Azure Automation account, the Runbook has to be created. So far there is nothing different than Jorg already described. Here we do exactly as Jorg described, by creating the Runbook with type PowerShell and save it. For the steps up till here, please have a look at Jorg his blog.
The PowerShell code used in the Runbook is slightly different though. Below the code Dave and I setup. The script includes a variable that should be adjusted according to your own configuration, which is the credential name.
Param (
    # To retrieve dynamic values in a webhook request, only this WebhookDate object parameter is supported, we need to pass it in the body of the webhook request.
    [Parameter(Mandatory=$False,Position=1)]
    [object] $WebhookData
)
Write-Output "Runbook kicking off.."
$errorActionPreference = "Stop"
Write-Output "Get all parameters from the WebhookData parameter.."
$Parameters = (ConvertFrom-Json -InputObject $WebhookData.RequestBody)
Write-Output $Parameters
Write-Output "Get the parameter values.."
$WorkspaceName = $Parameters.WorkspaceName
$Server = "powerbi://api.powerbi.com/v1.0/myorg/$WorkspaceName"
$Database = $Parameters.Database
$TableName = $Parameters.TableName
$RefreshType = $Parameters.RefreshType
$CallBackUri = $Parameters.callBackUri
Try {
    Write-Output "Retrieve the Service Account credentials from the Automation Account credential.."
    $Credential = Get-AutomationPSCredential -Name '{YourCredentialName}'
    Write-Output "Invoke the table process.."
    $result = Invoke-ProcessTable -Server $Server -Database "$Database" -TableName "$TableName" -RefreshType $RefreshType -Credential $Credential

    Write-Output "Results:"
    $result
    Write-Output "Result.XmlaResults:"
    $result.XmlaResults
    $Body = @{
        StatusCode = "200"
    }
    Write-Output "Invoke call back to ADF with status 200.."
    Invoke-RestMethod -Method Post -Uri $CallBackUri -Body $Body
}
Catch{
    Write-Output "An error occurred:"
    Write-Output $_
    # Return error in case of failure
    $Body = @{
        StatusCode = "400"
    }
    Write-Output "Invoke call back to ADF with status 400.."
    Invoke-RestMethod -Method Post -Uri $CallBackUri -Body $Body
}
Write-Output "Runbook finished."
Webhook request
Other than the credential getting referred, you might have also noticed that several input variables are required to kick-off the runbook. This information is coming from the webhook request that is send by Azure Data Factory to Azure Automation. The webhook is an HTTP call that can contain information in the request body and that is what we use to send information from Data Factory to your Runbook. You can read everything about webhooks in combination with runbooks in de Microsoft documentation.
Creating a webhook
In order to create a webhook, please go to the Azure Runbook resource in the Azure Portal. There you will find a button in the top ribbon to add a webhook. The URL given while creating the webhook is important. Please copy it directly and save it in Key Vault. This URL is a security token that allows the runbook to be triggered from third-party applications.

Sending the request from Data Factory to Azure Automation
From Azure Data Factory, we send the request to run to the Azure Automation Runbook. This is done via the webhook we just created. As said before, the webook URL is a security token, so please be careful with this and save it in Key Vault.
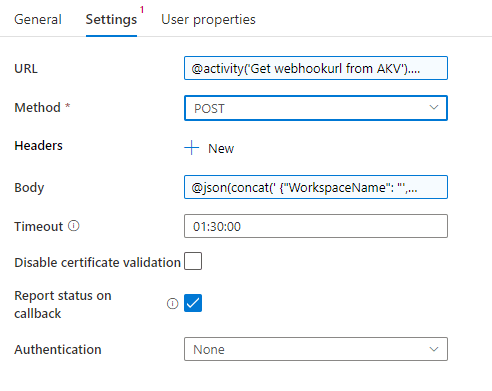
Previously we explained how you can get information from Azure Key Vault available in Azure Data Factory. The next step is to do the same for the webhook URL. As a building block in Azure Data Factory, we can use webhooks. In the settings of this webhook, please specify to use the output of the earlier step that retrieves the webook URL from Key Vault. In the settings of the Data Factory activity, you can configure this by adding the below snippet in the URL box. Please also make sure that the name referenced is in line with the name of the earlier Data Factory activity that retrieves the webhook URL.
@activity('Get webhookurl from AKV').output.valueIn the body of the webhook activity, we have to pass some details to the Azure Automation Runbook. These details include everything about the dataset and table we want to refresh, as well as the workspace where this dataset is located in the Power BI Service. In our solution, we put this information in pipeline parameters in Azure Data Factory. Below the snippet of the information we send in the body of the webhook pipeline activity.
@json(
	concat('
		{"WorkspaceName": "',pipeline().parameters.workspacename,'",
		"Database": "',pipeline().parameters.database,'",
		"TableName": "',pipeline().parameters.table2,'",
		"RefreshType":"Full"}'
		)
	)
The variables defined above, will be used to create the XMLA endpoint connection string in order to connect to the Power BI dataset. The XMLA connection string to connect to the related Power BI Workspace is build up as follows:
powerbi://api.powerbi.com/v1.0/myorg/{WorkspaceName}
You can see that this concatenation of the information retrieved via the body in the webhook URL to get to the XMLA connection string, happens in the PowerShell script as shared above.
Combining this all together, the configuration of the pipeline activity in Azure Data Factory looks as follows;
The end state pipeline
The end state pipeline in Azure Data Factory looks like the image shown below. Each of the elements explained per referenced number below.
- Get TenantId / ClientId / Secret / webhookurl from Azure Key Vault: This step receives the authentication information from Azure Key Vault to be used in the following steps.
- Get AAD Token: Based on the TenantId / Client Id and Secret received from Key Vault, we will authenticate to Power BI to get the AAD token from the Azure Active Directory authentication service. This is required to call the dataflow refresh API.
- For Each Dataflow: This block loops through all dataflows in the parameter “Dataflows” and starts a refresh for all of them by executing the pipeline “Dataflow Refresh” Until dataflow refresh complete: Checks for each dataflow the refresh status every 15 seconds. This can be changed to any X seconds.
- Trigger Azure Runbook table X: The WebhookUrl which is received from Key Vault in step 1, is the URL to trigger the Azure Automation Runbook. This step triggers the Runbook to refresh the table given in parameter “table” and “table2”. In this example we use three separate tables and therefore you see this step trice.

Dataflow ForEach loop
Power BI dataflow refreshes are triggered in the third step as part of a ForEach loop. This might be a bit out of context. But in the solution we build for a customer, we first want to process dataflows, which then will be imported into the data model. We use dataflows here as intermediate step where each dataflow represents a single table that we want to refresh in our data model. Therefore, we want to show you how we setup this dataflow element in Data Factory too. Here the native Power BI REST API is used for triggering the dataflows to refresh. Dataflow refreshes are part of an ForEach loop as there can be multiple down-stream dataflows that you want to refresh before the dataset can be triggered to refresh. All dataflows are specified in pipeline parameters. Below a more detailed view of the dataflow loop, where some specific logic is applied.
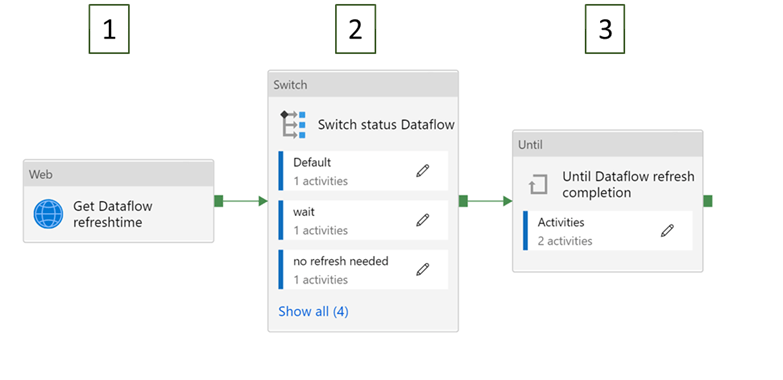
- Get Dataflow refreshtime: Get the last refresh time of the dataflow.
- Switch status Dataflow:
- No refresh needed: If the refresh has been < X minutes ago, the dataflow will not refresh again.
- Wait: If the dataflow is currently refreshing, the pipeline will wait until this refresh is finished.
- Start refresh: if the dataflow is currently not refreshing and the refresh is more than > X minutes ago, it will start a refresh.
- X is set to 30 minutes in this example.
- Until dataflow refresh completion: Checks every 120 seconds what the status is of the dataflow. The pipeline will continue with checking until the status reaches “Succeeded”. It times out after 1 hour. When all dataflows are finished, the single table refresh will start.
As mentioned, there is one variable that you have to change. In one of the first steps with Azure Automation, you created a credential and gave it a name. Now, in line 20 of the code, you will see the credential getting referred. In the code you have to enter your credential name. You can also find this credential name in the editing menu of your Azure Automation Runbook.
Monitoring the solution
As we use different services in Azure, there are multiple aspects of this solution that you want to monitor. Let’s have a look at both Azure Data Factory as well as Azure Automation. Lets start with the later one.
Running the Azure Automation Runbook
Once everything is set and tested, the runbook will also capture logging of all events that happened during a single run of the runbook. Once you go to your runbooks in the Azure Portal, you will find all past runs listed. If you click one of the runs you will get a view showing you everything about that specific run. The PowerShell code snippet shared above, includes continues status messages send to the logging system. With that, you can see each individual step in the script and the execution start and end time associated with it.

Logging in Azure Data Factory
Azure Data Factory has a specific monitoring section in the interface. This section includes all details about past runs of Data Factory pipelines in table as well as a visual interface. You can directly see which step in your pipeline might have failed. Also, in the bottom table you can see each individual pipeline task with start time, duration and its status.

As you can see, run details from the Azure Runbook are also send back to Azure Data Factory. Here we see that the Runbook was successfully triggered. Though, we do not see yet if the runbook has been executed successful. Therefore we need telemetry from both Azure Services at this moment.
A nice enhancement for monitoring capabilities of this solution would be to store all run telemetry in Azure Log Analytics (Azure Monitor). In this post, we did not cover that, but this documentation describes how you can configure Azure Monitor for Azure Data Factory. Of course, a nice Power BI report on top could combine all monitoring data together.
Co-authors

This blog and solution are co-authored by Paulien van Eijk and Dave Ruijter.
Paulien van Eijk
Paulien is an enthusiastic consultant with a passion for data analytics and data science. Her interests come forth in her education, in which she was thought the economics, programming and mathematics. This taught her to think critically and view problems from multiple points of view. Paulien is a Power BI expert who also explores side steps in Azure Data Platform.

Dave Ruijter
Dave is a freelance Azure Solution Architect Data & Analytics. He is also Most Valuable Professional in the category Data Platform. Dave has over a decade experience in the Microsoft Data & Analytics stack. Dave always aims to leveraging the full potential of the Microsoft Azure Data Platform and Power Platform. He brings a vast amount of consultancy experience to the table and is always eager to take things to the next level. Dave has received the Microsoft MVP Award for his deep knowledge of Microsoft products and services and community leadership.
Links
- Blog post: Trigger a single table to refresh in the Power BI Service
- Blog by Dave Ruijter: How to trigger a Power BI Dataset refresh using Azure Data Factory
- Microsoft Documentation: Asynchronous refresh with REST API
- Blog by Jorg Klein: Process Azure Analysis Services database from Azure Automation
- Microsoft Documentation: Webhooks for Azure Runbooks
- Microsoft Documentation: Monitoring Azure Data Factory
- Microsoft Documentation: Integration with Azure Monitor

Pingback: Automating Single Table Refresh with Azure Data Factory and Azure Automation – Curated SQL
Pingback: Chris Webb's BI Blog: Troubleshooting Power BI Timeouts, Part 1: The Two/Five Hour Import Refresh Limit Chris Webb's BI Blog
Hi
Perfect blog. very well written. Working as expected.
Facing a small issue –
a) Workspace name can be changed very easily
b) we use suffix/ prefix to identify Dev and production environment as well so we don’t want to hardcode the name.
Is there any ways to use Workspace & Dataset IDs instead of names or any other way to workout this ?
Rds,
A.MAN
LikeLike
Hi,
There is no way of doing this, since you’re using the XMLA endpoint. Read more about the XMLA connection string and how you can deal with duplicate workspace names in the docs here: https://docs.microsoft.com/en-us/power-bi/admin/service-premium-connect-tools
Though, given that you have a strict setup of workspace naming, as you described yourself, I think your workspace name is not adapted to change so much 🙃
–Marc
LikeLike
For me , Until dataflow refresh task is getting failed and not able to get the refresh status of the dataflow?? Any inputs would be really appreciated..
LikeLike
Pingback: Script and automate Power BI Backup operations – Data – Marc
Pingback: Orchestrate Power BI Semantic model refreshes through Fabric Pipelines – Data – Marc