In some cases, you might want to split your report and data model into separate Power BI Desktop files. For example, to work in together on the same content or create multiple reports based on the same dataset. There can be many reasons to do this. But once you started building everything one file, you don’t want to do a lot of rework to split it up. What to do to avoid rework and split it up?
When we start a project…
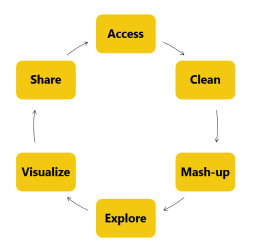 If you are building up your Power BI reports, you first start with clean and mash-up your data as usual. Probably you will do this in the Query editor in Power BI, if this is not already done in a layer between the source system and reporting layer. After you are done with that, you will start exploring the data, visualize it and share the first results with the users.
I agree, it is a simplistic description of all steps that might happen between gaining requirements and publishing your first results to the Power BI service. But let’s assume this is the case… Once the key-users are using your reports and dashboards, new requirements will arise and result in an expansion of your data model.
After a while, your PBIX files will become so large, that it is uncontrollable. In addition, we didn’t even though about self-service scenarios and building multiple reports based on the same data model. What to do next? Multi-file strategy is your answer!
What is a multi-file strategy?
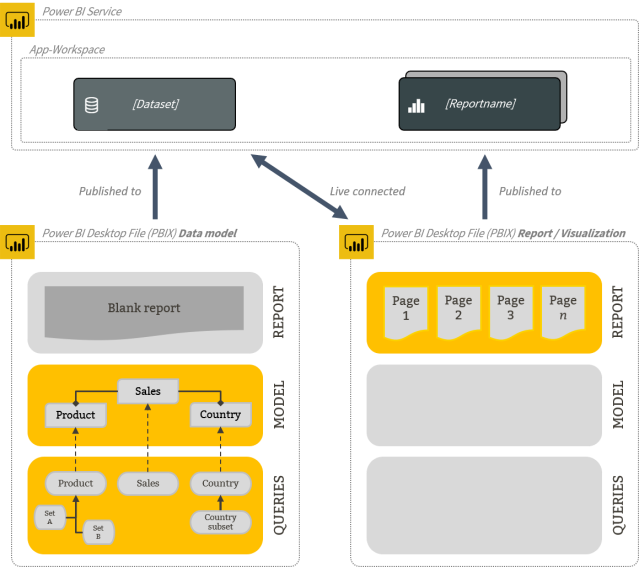
Normally a Power BI Desktop file (PBIX) contains your queries, data model, and reports (visualization). Looking at a multi-file strategy, we split this up into two (or more) files.
The first file only contains the queries and data model. The second file is directly connected to the first one (direct query) and reads the data model. The file it selves includes all report content like visualizations, booksmarks and everything related to that. By working this way, you will be able to build multiple reports based on the same dataset.
Why should we split it up?
Actually, Why should we split our data model and report in to multiple files? There can be many reasons to do this.
When you are working in an Agile team, where one team member can maintain and update the data model, and another team member can work on the visualizations.
Another case can be that you want to build multiple reports based on the same data model. What you can do, is copy your PBIX file, create another report and publish to the Power BI Service. You don’t want to do this. Simply because you must maintain two data models, schedule refresh twice and arrange your row level security twice as well. Actually, this is a scenario where mistakes are made quickly.
You can probably think of many more scenarios for which this can be useful. Of course there are always alternatives and counter arguments. Maybe some people will suggest moving as many as possible into dataflows so you only have to schedule your refresh once. But actually, dataflows is not intended to replace and centralize complete data models, and you still need to arrange your row level security multiple times.
Read all about true intend of dataflows in Matthew Roche his blog.
Another scenario can be that you made very impact full changes to your data model. This can break the visualization file. Think about removing or adding columns or tables. I have experienced this a few times, but I was able to fix it simply by closing my reporting file and reopen it.
How to move over?
Enough about the why, let’s move on to the how! First, I want to jump one step back to get clear how we can connect a Power BI Report to an existing data model in the Power BI Service. Follow the below steps to get this thing working.
 Publish the Power BI Desktop file including the dataset to the workspace of your choice.
- Open a new Power BI Desktop file.
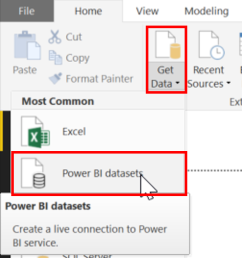
- Click ‘Get Data’.
- Click ‘Power BI Datasets’.
- Pick the same workspace as where you published the dataset to in the first step.
- Now your new Power BI file will live connect to the dataset in the Power BI Service.
Now you know how to connect by default to an existing dataset in the Power BI Service, we can jump in to the options you have to move over when your report is already there. You have a few options to get this working. It depends on the complexity of your report which one works best for you.
Option 1:
In the November 2018 update the Power BI team made it possible to copy-paste content between Power BI Desktop files. Follow the below steps to get this working:
- Publish the Power BI Desktop file including the dataset to the workspace of your choice.
- Open a new Power BI Desktop file.
- In necessary, import your theme file in the Power BI file.
- Click ‘Get Data’.
- Click ‘Power BI Datasets’, now you are directly connecting to the dataset in the Power BI Service.
- Copy-paste all content from the original file to the new visualization file.
- Save the new PBIX file. Give it a logical name for your end-users representing the report content.
- Publish the PBIX file. Automatically it will be published to the same workspace as where the dataset is in.
I am not a fan of this solution myself. When you do have a very big report with a lot of pages, this will cost you a lot of time. But still, it will save you time comparing it to recreating the complete report. Besides that, there is another disadvantage of this method. There is a big risk that you will forget to copy your hidden visuals which are triggered by your bookmarks. Talking about bookmarks, they won’t be copied to the new report. So, you have to re-create all bookmarks.
I though, there should be another way of doing this… and that is where we jump into the second option.
Option 2:
There is a better option to get this thing working. Follow the below steps
- Duplicate your original file.
- Rename the files to logical names, (e.g. Dataset and one with a logical name for your end-users representing the report content).
- Make sure the file you will be using for the data model is published to the Power BI Service in the workspace of your choice. If this is not done yet, publish it.
- Open the file you will be using for the visualizations.
- Open the Query Editor to remove all data. We will be doing this in the Query Editor because maybe you have unloaded tables, parameters and functions as well.

- In the Query Editor, you will see all queries, parameters and functions. Select all of them and delete them. Unfortunately, CTRL + A doesn’t work. But you can click the top one, scroll down and click the bottom one while holding the SHIFT button.
- Click ‘Close & Apply’ so now all your existing connections to the data model will be removed.
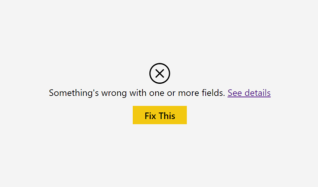 Back in Power BI desktop you will see that all your visualizations are broken. Don’t change anything and do not click ‘Fix This’ because that will remove your visual! Leave them as they are. Looking at the error, it will tell you that there is something wrong with one or more fields, which is true because you deleted them.
- Click ‘Get Data’.
- Click ‘Power BI Datasets’, now you are directly connecting to the dataset in the Power BI Service.
- Save the new PBIX file.
- Publish the PBIX file. Automatically it will be published to the same workspace as where the dataset is in.
And you’re done!
By using option two, all your settings, visualizations, bookmarks and inter-activities will remain the same. Option two does have a some more steps. But in the end, it is a lot faster!
Restrictions
For now, you are forced to publish your visualization report to the same workspace as your dataset is in. As a direct result of that, you will only have one workspace including one or more reports connected to the data model. When you publish the content as an App, everything will be in the same app since you can only have one app per workspace. In case you want to publish different reports connected to the same dataset to a different group of users, you are stuck. This might be an issue to your case.
But luckily there is an announcement on the Public Power BI Roadmap. Below a short part of the full announcement.
…
Shared datasets can be used across workspaces—that is, a report in workspace A can refer to a dataset in workspace B. This way, an organization can set up a number of trusted and reliable datasets in a specific workspace and can enable analysts across the org to work with this data in their own workspaces to create new reports and dashboards. A new permission model ensures that only the right users get access to those datasets; a new dataset discovery experience (shown below) provides users with a single pane of glass to easily find all datasets they have access to. This discovery experience will be consistent in both the service and the desktop.
…
This announcement will make it possible to re-use your dataset cross workspace. In that case, you will be allowed to publish the report with only visualizations included to another workspace than where the dataset is in.
Read more about this announcement on the Public Power BI Roadmap.

Hello Marc,
Thank you for sharing this approach. I was already splitting up files but used option 1 but with up to 15 pages in a report that is a lot of work. I am going to try option 2 next time 🙂
Do you have experience with splitting up files with RLS on different tables? So RLS in report 1 filters customers and RLS in report 2 should only filter products. Is this possible?Regards, Ello
LikeLike
Hi Ello,
I’m not fully understanding what your looking for. But in the context of my blog, your RLS should be in the data model file. When you’re connecting to the datamodel, your RLS will be applied automatically for all other reports. You can’t apply different or additional RLS to the report file then which is applied in your datamodel file.
Regards,
Marc
LikeLike
Pingback: Multi-File Power BI – Curated SQL
Hello Marc,
I have tried option 2 and this really saves time when reusing a dataset in multiple files. Thank you again.
The thing I encountered is that after step 7 you need to remove all tables that are created with DAX (e.g. a date table) otherwise it is not possible to choose a Power BI Dataset.
Regards,
Ello
LikeLike
Really thanks, buddy! This will be useful while building my semantic layer.
LikeLiked by 1 person
Pingback: Migrate Analysis Services models to Power BI using Tabular Editor – Data – Marc
Thanks Marc, I have been using Option 1 and will benefit greatly from your Option 2.
LikeLike
Pingback: Power BI Shared Datasets: Teil 2 Praxisthemen – Linearis :: Self-Service Business Intelligence
Nice post thanks for shharing
LikeLike